The P55/Lynnfield platform has been around for just over a year now, and is a great way to get yourself some excellent bang for buck performance, with CPUs starting at around £80 and boards as little as £70, you can build a fantastic gaming/number crunching system for relatively little money. At stock speeds, people may find that they would like a little more power, so the logical thing to do is to overclock it, and that's what we are going to do today.
Since we launched the i7 overclocking guide for beginners last June, it has had over a quarter of a million unique hits, making it one of the most-read overclocking guides on the internet, something that we are extremely proud of. In that time, we have had numerous requests for a P55/Lynnfield overclocking guide, but for one reason or another, we either haven't had the hardware, or haven't had the time, but now we have both, so here it is...
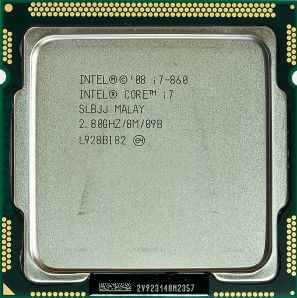
I'll also be using an i7 860, which is the mid range, mid priced CPU for the Lynnfield platform, featuring four cores and a further four threads (more on this later). Don't worry if you have an i5 750, or other variant, the steps that we take here will work for all models, although some adjustment of the voltages may be necessary.
Before we go any further, it is important that you read the following paragraph:
nbsp;
So, what are we doing and why?
Well, we are going to take your i7 860 from its standard 2.8GHz speed and run it as fast as it'll go with 1.4v Vcore*. This increase in speed can make your day to day tasks run quicker and any number crunching such as folding or video encoding or even Photoshop processing should be more fluid and less time consuming.
*You may find that your CPU requires more or less voltage than the one I'm using, it really is impossible to predict, until you actually start to overclock it, so if it isn't stable using the voltages that I use, try a little higher and then test again.
If you are using an i5 processor, you will most likely find that you need less voltage for the IMC and VCore than I use for my i7 860, and if this is the case, simply adjust accordingly.
Why 1.4v Vcore?
The i5 and i7 processors can run hot when you start to add extra voltage, so we want to keep this to a minimum.
We will not be going for extreme overclocks, that's not what this guide is about, we will be looking for an easily sustainable, 24/7 overclock with as little voltage as possible. If it's extreme overclocking you want, you shouldn't be needing a guide.
Things to know before we get started
Cooling, Coolers, Airflow And Thermal Pastes.
We already know that your i5/i7 processor can run hot, so you will need a decent cooler - There are lots of great coolers out there and rather than fill up this guide with recommendations.
Along with your cooler, you'll need some thermal paste - again, please ask on the forums for any advice on choosing your goop as there are loads on the market, ranging from excellent, to decidedly mediocre. I tend to use Arctic Silver Ceramique as it is non conductive and performs well.
Good air flow through your case is essential. If you don't have some kind of circulation of fresh air, your system is going to overheat - We don't want that as excessive heat can cause instability and shorten the life of some components. If you have a lot of messy wires, it's worth spending a few minutes tidying them up and holding them in place with cable ties or velcro straps.
Power Supplies.
I can't stress to you enough, the importance of having a good quality power supply. I'm not saying that you should go out and buy the most expensive, or highest wattage unit that you can find, but what I am saying is to avoid the cheapest units. Always go for a brand you know, and if you are unsure, please ask for help, that's what we are here for.
Why do we need a good power supply?
You need a good PSU because it is the heart of your system. When you overclock any system, you start to draw a lot more power than you would on a stock system, if the PSU can't deliver the power that is demanded of it, it may fail - This is where the difference between a good quality PSU and a poor quality PSU may become apparent. A poor quality PSU, when it fails, will quite often take out other expensive components, such as your graphics card, or hard drives, or if you are really unlucky, your processor and motherboard. The bottom line is, get a decent PSU, you'll be glad you did.
Memory.
When choosing your memory with a view to overclocking, it's a good idea to get a set of modules that will go slightly higher than you plan to go (headroom). Give yourself a bit of headroom by getting some decent quality memory, it will be one less thing to worry about later if things don't quite go as smoothly as you'd planned. For overclocking on the P55 / Lynnfield platform, I'd recommend at least 1600MHz memory and if you are using Vista/Windows 7 64 bit, then a 4GB kit will keep your system happy too.
Avoid generic, unbranded memory - It can be more trouble than its worth.
Start with a stable system.
Before you start overclocking, you need to make sure that your system runs 100% stable at stock speeds, grab yourself a stress testing program such as Prime95 (or whatever you prefer) and run it for an hour or so and hopefully you won't have any problems - if you do have problems, please ask on the forums for assistance, for the rest of this guide, I will assume that you have already established that your system is stable, and that you have adequate cooling and case ventilation.
Software.
You will need a few pieces of free software, I'll explain how to use these as we go:
- CPU-Z - This gives us slots of information about the speed and status of the system.
- Prime95 - We will be using this for stress testing only.
- CoreTemp - This gives us a relatively accurate temperature reading for our CPU's cores.
There are plenty of other excellent, and free pieces of software that you can use if you prefer, LinX is a good stress tester, but be warned, it generates a massive amount of heat and stresses the CPU to the limit. Because of this, you don't need to run it for as long as you might do when running Prime95.
A good alternative temperature reading program is RealTemp.
Overclocking Background and Theory
I'll keep this part short because this guide is aimed at beginners, but here's a quote from the original C2D guide:
Every piece of hardware is unique - No two CPUs, no two sets of RAM, no two motherboards will give exactly the same results, so keep this in mind when you start overclocking.
You might have a friend that has all the same gear as you, and yet he can overclock his quite a bit higher. Don't worry! - A lot of this is pot luck, some of it is knowing your hardware, and a small part of it is patience. The rest of it, you'll pick up as you get a feel for how things work.
ll of the above still holds true for i5/i7 overclocking.
Basically, all we are doing is running the CPU faster than it was intended, we do this by raising the BCLK (Base Clock) and adding a little voltage, it's pretty much as simple as that.
What CPU should I get?
P55 boards use the LGA 1156 socket, this means that there is a good selection of CPUs to choose from, with something to suit most eventualities. The current range goes something like this:
- i3 (Clarkdale) - These CPUs are compatible with P55 and feature on-board graphics (you'll need a H55/H57 board to use the graphics), but overclocking them is slightly different as the voltages are generally much less than i5/i7, so we will hopefully do a guide for them later.
- i5 (Clarkdale) - Same story as the i3 Clarkdale CPUs, hardware permitting, we'll do a guide for Clarkdale, most of them are highly overclockable. Models include the 650, 655K, 660, 661, 670, 680.
- i5 (Lynnfield) - Models in this range include the 750, 750S and 760. The best bang for buck at the moment seems to be the 750.
- i7 - (Nehalem) - There are several processors based on Intel's Nehalem architecture that are compatible with P55, and they are the 860, 860S, 870, 870S, 875K and 880. Currently, the best bang for buck is the 860, this CPU has four cores, but also features hyperthreading, which allows for a further four threads (so eight in total). Hyperthreaded CPUs are great if you can make use of the extra threads, but the extra power comes at the cost of a lot more generated heat, extra power draw and the heat can affect your overclocking potential, so if you plan on overclocking one of these, you will need good cooling.
Important Terminology.
Before we start, here's a quick glossary of terms, you can also find out what many acronyms and key words mean by hovering your mouse over them too. I'll just cover the basics here.
- BCLK (Base Clock) - This is the setting that we will be increasing to achieve our desired overclock. The default value for our 860 processor is 133.
- QPI (Quick Path Interconnect) - Confusingly, the QPI is found on the socket 1366 i7 systems, but some manufacturers (Gigabyte) have chosen to keep some of the setting names the same as their socket 1366 i7 boards. The P55 doesn't actually have QPI as such, rather it has DMI (Direct Media Interface) to connect the processor to the P55 chipset. This isn't directly relevant for this guide, but I thought I would mention it, in case you were wondering!
- IMC - This stands for Integrated Memory Controller. On previous Intel platforms, the memory controller was on a separate chip known as the North bridge, but with the latest Lynnfield and Nehalem platforms, the memory controller is now on die (on the CPU), hence the name IMC. When overclocking on the Lynnfield platform, you will generally need to increase the IMC voltage to achieve stability, especially at higher clock speeds (say 3.8GHz+). You may also need to increase this more if you run a full set of memory modules, or wish to run your modules at high speeds or tight timings.
- Hyperthreading - This is a highly complex feature of Intel CPUs, but to simplify, if you have a four core processor with hyperthreading enabled, a compatible operating system will see the four cores plus four virtual cores. If you run software that can take full advantage of this feature, then it can provide some incredible processing speeds, however, the extra speed comes at the cost of increased power consumption and generated heat. Try with it enabled and disabled, you may also find that you need less Vcore as a result of disabling hyperthreading too.
- Multipliers (Multis) and Dividers - As with previous platforms, i3/i5/i7 uses multipliers and dividers, but the way that i3/i7/i5 differs is that there are several of them for various things. For example, your CPU may have a default multiplier (Multi) of 20x and there is a multiplier for the memory and one for the UnCore (We don't need to be concerned with the uncore at the moment as this is a beginner's guide).
- UnCore - This is simply any part of the processor that is not the core, such as the memory controller or cache - It isn't too relevant for this guide, but I do mention it, so it is better explained.
- Turbo Mode - See the explanation below**.
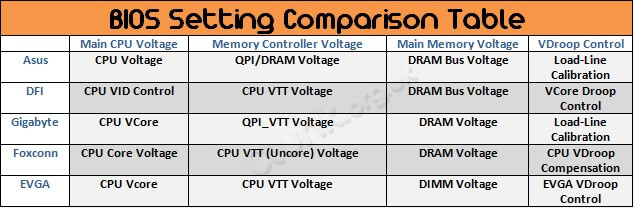
- Vcore - This is just another term for the main CPU Voltage, the name may differ for your motherboard (see the table below).
In the table below, I've listed the main settings that we will be changing during this guide and added a conversion to other manufacturers settings so that people can use the guide with other manufacturer's motherboards. If there are any other settings you'd like me to add, just give me a shout.
Calculating Your Processor Speed.
To try and simplify things further, let's take a look at how we work out our processor speed and how it related to the multipliers and dividers.
The bottom line is that the CPU Multi x BCLK = Processor speed in MHz, so at the stock BCLK of 133 and the 22x multi, we get 2926MHz. The astute among you may have noticed that this is slightly more than the the 2800MHz (2.8GHz) that is quoted on the CPU box and the reason for this is Turbo mode. If you have a different model of CPU that has a higher or lower multiplier, you can use the simple calculation that I mentioned here, and work it out for yourself.
**Turbo mode is quite a complex feature, but to sum it up, if enabled, it will give you an extra multi, so on our 860, we get 22x instead of 21x - If you do the maths, Turbo off = 21x 133 = 2793MHz (2.8GHz). For the purposes of this guide, we will be leaving Turbo mode on.
Keep all that in mind, the same rules apply when we are overclocking too.
Familiarise Yourself With The BIOS.
When you start overclocking, it's important that you familiarise yourself with your motherboard's BIOS. Just spend some time getting to know some of the basics and this will help you when you move to the more advanced things later.
For the purposes of this guide, I'll assume that you know how to enter the BIOS, make changes and save and exit.
Next, getting started...