It's that time again folks! In our ever popular series of overclocking guides, we've covered most of the Intel chipsets from the launch of Core 2 Duo. Overclocking the C2D platform was really easy once you got to know what everything did, i7 is no exception, and in many ways, the basics are the same, however, there are a few new things to get to grips with, and that's exactly what we're going to do in this guide.
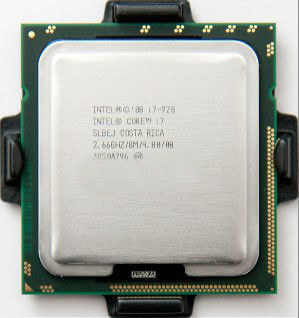
The i7 platform has been around for a few months now and has become quite popular, especially in enthusiast circles. I've tried out many motherboards from different manufacturers and my favourite, bar none is the Asus P6T Deluxe OC palm (Just P6T from here on in). I will be using the P6T in the guide and I will be referencing its BIOS settings throughout - I'll also be using an Intel i7 920 DO processor and some Corsair Dominator 1600MHz memory, a triple channel, 6GB kit to be exact, more on the hardware side of things later.
So, what are we doing and why?
Well, we are going to take your i7 920 from its standard 2.66GHz speed and run it as fast as it'll go with 1.25v Vcore. This increase in speed can make your day to day tasks run quicker and any number crunching such as folding or video encoding or even Photoshop processing should be more fluid and less time consuming.
Why 1.25v Vcore?
The i7 processors can run hot when you overclock and start to add extra voltage, so we want to keep this to a minimum.
We will not be going for extreme overclocks, that's not what this guide is about, we will be looking for an easily sustainable, 24/7 overclock with as little voltage as possible. If it's extreme overclocking you want, you shouldn't be needing a guide.
Things to know before we get started.
Cooling, Coolers, Airflow And Thermal Pastes.
We already know that your i7 processor runs hot, so you will need a decent cooler - There are lots of great coolers out there and rather than fill up this guide with recommendations.
Along with your cooler, you'll need some thermal paste, again, please ask on the forums for any advice on choosing your goop as there are loads on the market ranging from excellent, to mediocre. I tend to use Arctic Silver Ceramique as it is non conductive and performs well.
Good air flow through your case is essential. If you don't have some kind of circulation of fresh air, your system is going to overheat - We don't want that as excessive heat can cause instability and shorten the life of some components. If you have a lot of messy wires, it's worth spending a few minutes tidying them up and holding them in place with cable ties or velcro straps.
Power Supplies.
I can't stress to you enough, the importance of having a good quality power supply. I'm not saying that you should go out and buy the most expensive unit that you can find, but what I am saying is to avoid the cheapest units. Always go for a brand you know, and if you are unsure, please ask for help, that's what we are here for. At the moment, Corsair are doing some excellent PSUs, and you can't really go to far wrong with any of their range.
Why do we need a good power supply?
You need a good PSU because it is the heart of your system. When you start to overclock any system, you start to draw a lot more power than you would on a stock system, if the PSU can't deliver the power that is demanded of it, it may fail - This is where the difference between a good quality PSU and a poor quality PSU may become apparent. A poor quality PSU, when it fails, will quite often take out other expensive components, such as your graphics card, or hard drives, or if you are really unlucky, your processor and motherboard. The bottom line is, get a decent PSU, you'll be glad you did.
Memory.
When choosing your memory with a view to overclocking, it's a good idea to get a set of modules that will go slightly higher than you plan to go (headroom). Give yourself a bit of headroom by getting some decent quality memory, it will be one less thing to worry about later if things don't quite go as smoothly as you'd planned. For overclocking on the i7 platform, I'd recommend at least 1600MHz memory and if you are using Vista, then a 6GB kit will keep your system happy too.
Avoid generic, unbranded memory - It can be more trouble than its worth.
Start with a stable system.
Before you start overclocking, you need to make sure that your system runs 100% stable at stock speeds, grab yourself a stress testing program such as Prime95 (or whatever you prefer) and run it for an hour or so and hopefully you won't have any problems - if you do have problems, please ask on the forums for assistance, for the rest of this guide, I will assume that you have already established that your system is stable, and that you have adequate cooling and case ventilation.
Software.
You will need a few pieces of free software, I'll explain how to use these as we go:
- CPU-Z - This gives us slots of information about the speed and status of the system.
- Prime95 - We will be using the for stress testing only.
- CoreTemp - This gives us a relatively accurate temperature reading for our CPU's cores.
Overclocking Background and Theory
I'll keep this part short because this guide is aimed at beginners, but here's a quote from the original guide:
Every piece of hardware is unique - No two CPUs, no two sets of RAM, no two motherboards will give exactly the same results, so keep this in mind when you start overclocking.
You might have a friend that has all the same gear as you, and yet he can overclock his quite a bit higher. Don't worry! - A lot of this is pot luck, some of it is knowing your hardware, and a small part of it is patience. The rest of it, you'll pick up as you get a feel for how things work
All of the above still holds true for i7 overclocking.
Basically, all we are doing is running the CPU faster than it was intended, we do this by raising the BCLK (Base Clock) and adding a little voltage, it's as simple as that.
What CPU should I get?
Unlike the huge C2D range, the i7 range is quite small, with only four models currently on the shelves, the 920, 940, 950 and 975, the 920 comes in at just over £200 and represents the greatest bang for buck. Considering that when overclocked, pretty much all the models perform the same, a 920 is a no-brainer at the moment.
Important Terminology.
Before we start, here's a quick glossary of terms, you can also find out what many acronyms and key words mean by hovering your mouse over them too. I'll just cover the basics here.
- BCLK (Base Clock) - To keep things as simple as possible, this is the setting that we will be increasing to achieve our desired overclock. The default value for our 920 processor is 133.
- QPI (Quick Path Interconnect) - The QPI connects the processor to the In Out Hub (IOH) - In other words, it is the way that your processor talks to the rest of your system.
- Multipliers (Multis) and Dividers - As with previous platforms, i7 uses multipliers and dividers, but the way that i7 differs is that there are several of them for various things. For example, your CPU has a default multiplier (Multi) of 21x and there is a multiplier for the memory and the UnCore (We don't need to be concerned with these at the moment as this is a beginner's guide).
- UnCore - This is simply any part of the processor that is not the core, such as the memory controller or cache - It isn't too relevant for this guide, but I do mention it, so it is better explained.
- Turbo Mode - See the explanation below**.
- Vcore - This is just another term for the main CPU Voltage.
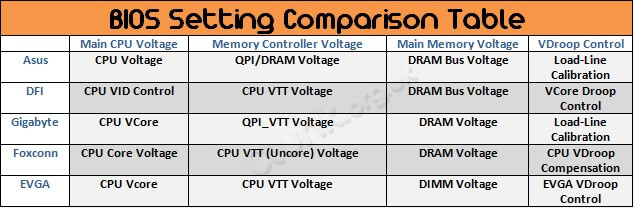
In the table below, I've listed the main settings that we will be changing during this guide and added a conversion to other manufacturers settings so that people can use the guide with other manufacturer's motherboards. If there are any other settings you'd like me to add, just give me a shout.
Calculating Your Processor Speed.
To try and simplify things further, let's take a look at how we work out our processor speed and how it related to the multipliers and dividers.
The bottom line is that the CPU Multi x BCLK = Processor speed in MHz, so at the stock BCLK of 133 and the 21x multi, we get 2793MHz. The astute among you may have noticed that this is slightly more than the the 2660MHz (2.66GHz) that is quoted on the CPU box and the reason for this is Turbo mode.
**Turbo mode is quite a complex feature, but to sum it up, if enabled, it will give you an extra multi, so on our 920, we get 21x instead of 20x - If you do the maths, Turbo off = 20x 133 = 2660MHz (2.66GHz). For the purposes of this guide, we will be leaving Turbo mode on.
Keep all that in mind, the same rules apply when we are overclocking too.
Familiarise Yourself With The BIOS.
When you start overclocking, it's important that you familiarise yourself with your motherboard's BIOS. Just spend some time getting to know some of the basics and this will help you when you move to the more advanced things later.
For the purposes of this guide, I'll assume that you know how to enter the BIOS, make changes and save and exit.
Next, getting started...