+ Reply to Thread
Page 1 of 21 1 2 3 4 5 6 7 8 11 ... LastLast
Results 1 to 10 of 203
Like Tree55Likes

Thread: Water Cooling Guide For Beginners

  1. #1
    Clunk's Avatar
    Clunk is offline Monkey Trousers
    Join Date
    Sep 2007
    Location
    Manchester, UK
    Posts
    16,607
    Liked
    1411 times
    Country:         England

    Water Cooling Guide For Beginners

    Water Cooling Guide For Beginners.


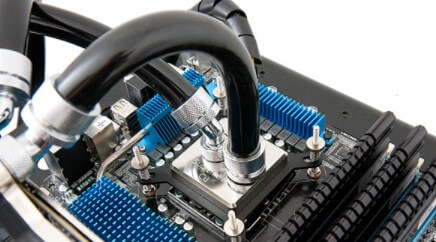
    Welcome to the latest in our highly popular series of beginners guides, this time we will be taking a look at the often misunderstood world of water cooling.

    I should point out that this is not a buying guide as such, it is simply an article to get you up and running, and keep you up and running with minimal fuss.

    There are many water cooling guides dotted around the tinterweb, but I want to try and simplify things even further and address as many of the frequently asked questions as possible.

    If you take your time, and follow the basic steps in this guide, you will find that building your first water cooling loop can be a very rewarding and trouble free exercise.

    Why water cooling?

    Well, there are three main reasons that you may want to go with water cooling:
    • High performance cooling - Generally much better temps than with air cooling, which usually equates to better overclocking potential too.
    • Silence - Most people don't want a hair dryer on their desk, water cooling can transform your noisy air cooled computer into a much more palatable, near-silent machine.
    • The bling factor/Aesthetics - Done correctly, a water cooled rig can be a real talking point, you needn't spend a fortune to get a great looking rig (although you can do!), some people like the understated look, others like the whole UV look, more on this later.
    Of course, you may want to combine all three aspects and go for a super high end system, we'll get to the pros and cons of that later.

    What We Are Not Going To Do In This Guide.

    As in most areas of computing, there are purists, water cooling is no exception, and many people love nothing more than to spend hours and lots of money trying to shave off that extra 0.5C here and 0.5C there in their quest for perfection. We've all been there, buying the most expensive water block, a couple of pumps, special fluid that promises lower temps.....bah! Will these extra fractions of a degree here and there do anything for your overclocks, well, no, not really. There are small benefits to be had, but once you get yourself a moderately good water cooled set up, you enter the land of diminishing returns and the more you spend, the less extra performance you get for your money with each step up.

    What We Are Going To Do In This Guide.

    In this guide, we will take you step by step through a basic CPU/GPU water cooling loop set up from start to finish. There are many different methods that people use for the various different aspects of water cooling, however, this guide will feature my own preferred methods and while some people may prefer other ways of doing things, everything mentioned here has worked well for me over the years and will no doubt work well for you. Try it and see! To sum up, we are going to look at building you a great water cooled system, if you want to tweak it to within an inch of its life later on, that's up to you!

    Let's get to it then...

    Index.

    1. Intro And Index.

    2. Selecting And Buying The Parts:
    3. The Right Tools For The Job

    4. Choose Your Case:
    5. Putting It All Together:
    6. Filling, Leak testing And Bleeding The Loop:
    7. Periodic Maintenance And Draining:
    8. Summary And Conclusion.

    Next, selecting and buying the parts...
    death, nam, jello900 and 5 others like this.

    Reply With Quote Reply With Quote

  2. #2
    Clunk's Avatar
    Clunk is offline Monkey Trousers
    Join Date
    Sep 2007
    Location
    Manchester, UK
    Posts
    16,607
    Liked
    1411 times
    Country:         England

    Selecting And Buying The Parts

    Selecting And Buying The Parts.

    As I've already mentioned, this isn't a buying guide as such, just a few pointers to help you establish what kind of gear you need for your system.

    Ask yourself, do you want performance or silence, or both? Do you just want the bling factor?

    Generally, if you want both performance and silence, you will end up paying a premium for high end parts. If you don't have a set budget, this is fine, but if you do, a little research is required and this is where you should ask on the forums for help.

    Cheap And Nasty Water Cooling.

    There are few things to be aware of when purchasing your gear, firstly, avoid the cheap Chinese kits that you may find on eBay, they are usually garbage. You may also find some similarly manufactured separates, blocks, pumps etc, these too can be avoided, they really aren't worth the hassle. Buy brands you know from reputable sellers (see our list of specialist water cooling sellers).

    Entry Level All-In-One Water Cooling Kits.

    These kinds of kits have been around for a number of years, Asetek have been at the forefront with these all in one kits, however the performance is generally slightly less than moderate to good air cooling. Corsair's H50 has improved on the Asetek design, but the performance still falls well short of the kind of water cooling that we are going to be looking at in this guide. Some designs fail completely.

    CPU Water Blocks.

    There are dozens of CPU blocks on the market to choose from, ranging from relatively cheap (sub £20), to right up to £80. The difference in performance between these blocks for most people isn't necessarily worth the money, with maybe 5-8C between the mid to high range blocks. From an aesthetics point of view, some of those high end blocks do look the business and will be a nice focal point in your rig, so that's something else to consider. In recent months, the trend has been to nickel plate everything to provide a shiny silver finish, this not only looks great, it doesn't tarnish like bare copper does, but it still has excellent heat conductivity.

    CPU block.


    Next, GPU water blocks...

    Reply With Quote Reply With Quote

  3. #3
    Clunk's Avatar
    Clunk is offline Monkey Trousers
    Join Date
    Sep 2007
    Location
    Manchester, UK
    Posts
    16,607
    Liked
    1411 times
    Country:         England

    GPU Water Blocks

    GPU Water Blocks.

    Standard / Universal GPU Water Blocks
    .


    The standard (or universal) GPU blocks can often be swapped from card to card over the course of a few upgrades, so if cost is a factor, then this type of block may be worth a look. The downsides are that they don't quite have the same good looks as their full cover cousins, and also they do not cover the VRAM or VRMs, so you will have to use RAM sinks or other after market coolers to cool those.

    Standard / Universal GPU block.


    Full Cover GPU water blocks.


    Full cover GPU blocks look great and can make it a bit easier to fit the tubing in certain circumstances, and they also cool the graphics card's memory (VRAM) as well. The only real drawback to these is that the heat from the VRAM will end up in the water and will need to be dissipated. It isn't a huge amount of heat, but it is worth keeping in mind.

    Full cover GPU block.


    Next, other water blocks...

    Reply With Quote Reply With Quote

  4. #4
    Clunk's Avatar
    Clunk is offline Monkey Trousers
    Join Date
    Sep 2007
    Location
    Manchester, UK
    Posts
    16,607
    Liked
    1411 times
    Country:         England

    Other Water Blocks

    Other Water Blocks.

    Motherboard Water Blocks.


    Whether you need one of these or not, largely depends on what motherboard you have and what you plan on doing with it. Some motherboards run very hot and can benefit from having their PWM section cooled, others run hot on the north bridge or south bridge, so again, this is something to look into before you start. For those people going for fantastic looks, these type of blocks are perfect. The only real downsides are that they are expensive, they are tailored to a specific board and usually bolt on from the rear of the motherboard, so if you need to remove the block for some reason, it will mean removing your motherboard from the case, which will sometimes mean removing the rest of the loop, depending on how it has been tubed. Bottom line - They look great and cool well, but can be a pain to work with and have a short working life.

    Full cover motherboard block.


    Chipset / Northbridge / Southbridge Water Blocks.

    On previous generations of motherboards, the memory controller (Northbridge) was part of the motherboard and this could get quite hot during overclocking, today's i7 platform has the memory controller on the CPU, so the only thing left on the board where the Northbridge was, is the chipset, or IOH (In/Out Hub). This generally runs quite cool for most of the time, but if you are running a pair of large graphics cards, the IOH can get start to get hot, whether it needs water cooling is entirely up to you, but my preference is to leave it air cooled on i7 systems. Also, this IOH/Chipset area is most likely covered by the "Motherboard Water Blocks" section above.

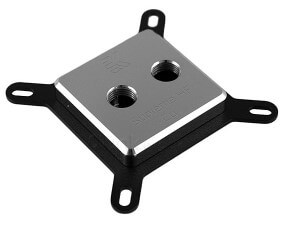
    If you do need a chipset/NB/SB block, I can recommend the EK number 5 shown below, the Dangerden Intel Universal MPC block is also excellent, as is the Swiftech MCW30. They all have their plus points and draw backs, but I prefer the EK for ease of mounting and general build quality.

    Use extreme care when fixing one of these to a bare die, if you rock it about, you can crack the die, or break off its corners, you can also damage the base of the block. The best way to fit one of these is to use a gasket that fits round the die and stops the block wobbling too much, although you still need to be really careful. Hold the block firmly on the die and tighten the screws until just about finger tight and see how it is, if it needs to go tighter, just a quarter turn at a time should do the trick.

    Chipset block.


    Next, reservoirs and T-lines...

    Reply With Quote Reply With Quote

  5. #5
    Clunk's Avatar
    Clunk is offline Monkey Trousers
    Join Date
    Sep 2007
    Location
    Manchester, UK
    Posts
    16,607
    Liked
    1411 times
    Country:         England

    Reservoirs And T-Lines

    Reservoirs And T-Lines.

    Reservoirs come in all kinds of shapes and sizes, from the compact pump and reservoir combos, to the 5.25" drive bay models, to the large tube shaped variety. All of them do exactly the same job and that is to allow you to fill the loop with water and then to trap air bubbles as they circulate round your loop. Depending on the make and model, some are much more efficient at catching these air bubbles before they go back into your loop.

    Multi-option tube reservoir.


    Once you've worked out where you want your reservoir to go, you just need to do a little research on what is currently the best solution for you. I have used many in the past and I found that some bay reservoirs can be a bit of a pain when it comes to bleeding, especially if you don't have it in the top drive bay, something that can be difficult if you have a radiator in the top of the case. The Swiftech MCRES are compact and work really well and come with a selection of useful brackets, very handy if you can't use a combo and space is an issue.

    If you are using a Laing DDC type pump, you may want to check out the XSPC DDC res top, these kind of combo models can save a lot of space and work really well. We ran one of these in the test bench for the last two years and it's been great.

    Bay reservoir.


    T-Lines.

    The T-Line isn't as common as it once was, and that's probably a good thing really, but I thought I'd include the info anyway. So, what is a T-Line? Well, it's an alternative to a reservoir, some people may find that if they just don't have the room for a reservoir, they can usually fit in a T-Line. It is as simple as it looks, just imagine taking one of your hoses (preferably a straight one) and cutting it and adding a T-Piece so it is in-line, then take a new piece of hose and connect it to the upward part of the T-Piece. The upward branch of tubing acts as a fill port and also it is where any air bubbles can escape from the loop, how efficient it is at letting the air out depends on the location of the T-Line and how the rest of the loop is configured. My first few loops had a T-Line in them, but nowadays, it's just as easy to get yourself a decent, suitably sized reservoir.

    Next, radiators and shrouds...

    Reply With Quote Reply With Quote

  6. #6
    Clunk's Avatar
    Clunk is offline Monkey Trousers
    Join Date
    Sep 2007
    Location
    Manchester, UK
    Posts
    16,607
    Liked
    1411 times
    Country:         England

    Radiators And Shrouds

    Radiators And Shrouds.

    Radiators can be quite bulky, so this is one of the main reasons to plan ahead. If you can imagine a radiator fixed to the top of your case (or wherever) and then add to that a set of fans, and then your barbs and enough tubing so that it can bend without kinking and you have taken up a fair old chunk of space.

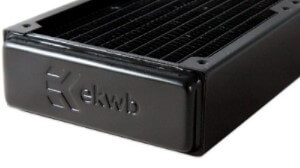
    There are some really good radiators on the market, but generally, you get what you pay for, possibly the best performing radiators out there are the Thermochill PA series, but, they do have their downsides in so much as they are quite bulky and much deeper than most other radiators and their paint job is truly awful and you will also need 3/8BSP barbs.

    There are lots of different sizes of radiator available, from 120mm and 160mm singles, to the old favourite 360mm (3x120mm), and more and more manufacturers are going down the 140mm route, so we have a few products emerging that use three and even four 140mm fans.

    How do I know what size radiator I'll need?

    This can be a tricky one, and it really depends on what exactly you plan to cool and what your aim is as far as silence and performance are concerned.

    An example would be, I have run a Thermochill PA120.2 for around two years in our test rig, this only had to cool our CPU, which at times was a heavily overclocked i7 920. This set up never missed a beat and ran with near silent fans, however, if you were to add a GPU into that same loop, then things would change slightly, the extra heat generated would have to be dissipated somehow or the water temp would gradually creep up and up, so by adding slightly more powerful fans, we can dissipate the heat more quickly. Unfortunately, faster fans generate more noise, so this solution isn't ideal for everyone, so the only real alternatives are to either dump the 120.2 and add a 120.3 or bigger, assuming we have the space, or we could add in a second radiator into the loop, even a single, decent 120mm will take the pressure off the 120.2 and allow you to run quieter again, an extra 120.2 would take the pressure off and leave you some headroom for future upgrades. Make sense so far? Good!

    EK Coolstream 360 radiator.


    Fan Hole Spacing.

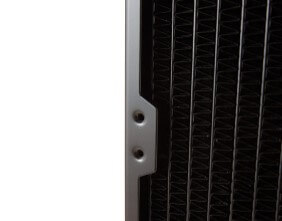
    This issue is becoming more and more irrelevant, but it's worth a mention for those people buying used gear. Older Thermochill radiators used a 25mm spacing between the fan screw holes that separate each fan on the radiator, nowadays they use 15mm, the same as everyone else. There were many accessories (and still are) and a few cases cut to fit the old 25mm spacing, so this is something to consider when making your purchase. Ideally, 15mm will give you a bit more longevity.

    Another issue that buyers should be aware of on older Thermochill radiators is that they use self tapping screws to attach the fans to them, I've never really understood why, but they were designed in such a way that if you didn't use the neoprene gasket that came with the radiator, or indeed a fan grill, the supplied screws would puncture the core of the radiator when you fitted it in place. I have killed an old PA120.3 myself this way, so I think it's best that people are aware of it, although I believe that they have changed over to machine screws now. I would still be wary of tightening the screws too far though. You have been warned!

    15mm spacing on an EK radiator.


    For more suggestions on suitable radiators, please ask on the forums.

    Shrouds.

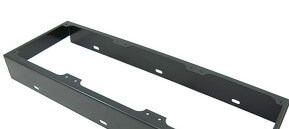
    What is a shroud? A shroud is simply a device that allows the radiator fans to be slightly further away from the core of the radiator and this gives a number of benefits.

    Firstly, all 120mm fans have a "dead spot", in other words, if you place a fan close to the core, there will be an area in the centre of the fan that has no air being pushed from it, and of course, the cooling to that part of the core will be less than the outer areas that are getting the full blast of air. Raising the fan off the core by a few centimetres can help improve performance slightly, but also, it can reduce noise too. You can do an experiment with this yourself, grab a piece of mesh or some material and hold it up to the blowing side of a fan, the closer you get, the louder the wind noise will become, the shroud works in the same way.

    For more detailed information on shroud testing, see this article.

    Thermochill shroud.


    Next, pumps...

    Reply With Quote Reply With Quote

  7. #7
    Clunk's Avatar
    Clunk is offline Monkey Trousers
    Join Date
    Sep 2007
    Location
    Manchester, UK
    Posts
    16,607
    Liked
    1411 times
    Country:         England

    Pumps

    Pumps.

    In recent years, the two main contenders were the Laing DDC and the Laing D5/Vario / Swiftech MCP655, the DDC comes in two flavours, a 9w and an 18w (Swiftech MCP350/MCP355). We have been running the 9w version in our test bench for the last couple of years and it has been excellent, it is very quiet (assuming it is properly isolated), uses minimal power and is powerful enough to run even moderate sized loops. The 18w, as you can imagine is a much more powerful beast and is more for people that want excellent performance at the cost of slightly more noise and double the power draw. The 18w version is by no means noisy, but it is essential that it is properly isolated, or, like it's little brother, it'll vibrate and whine and generally get on your nerves! The DDC comes with fixed 3/8" barbs as standard, so unless you are going to be using 3/8" tubing, you are going to need a new top for it, and there are lots to choose from. You can go for a simple Delrin/Acetal top that could increase the performance of the pump over the standard top, or you can go for a reservoir top, these can really save valuable space in your case.

    Replacement Delrin/Acetal DDC top.


    Exploded view of the DDC Pump.


    The second contender, the Laing D5 / Swiftech MCP655/Vario is a much larger pump than the DDC, it sports a 90° inlet and outlet configuration and it also comes with 1/2" barbs as standard. The D5 also comes in two varieties, the standard version and the Vario which has an adjustable speed knob on the back. There are different tops available for the D5 too, each offering different levels of performance and "bling". My own experience of the D5 (variomatic) was that it was quite whiny, even when isolated and it was quite bulky and difficult to position because of the way the inlet and outlets were positioned in relation to the mounting bracket, but aside from that it was a very powerful pump.

    D5 Pump.


    In the last year or so, another manufacturer has steadily gained a following, Jingway Technologies are the OEM behind several pumps from famous water cooling gear manufacturers such as Danger Den, EK, D-Tek and so on. These pumps bring excellent performance and are generally much cheaper than the Laing alternatives. The only real downside that I can see, is that if you want to run a pump/res combo, it can get a little bulky, see the image below.


    Isolating Materials.

    Pumps vibrate, this is especially noticeable when they come into contact with hard surfaces, so if your pump is sitting on the floor of the case, or up against the side panel or motherboard tray, it will need some kind of insulation. There are lots of things you can use for this, from bubble wrap, to foam, to pieces of Neoprene - Pretty much anything soft, most pumps come with some kind of sticky foam mat, but they aren't that great. One of the best things that I've found is clear silicon sealer, available from all builder's merchants in large tubes for less than £1.50. Take a small baking tray or anything that will give you around 1cm depth and squirt the sealer into it and smooth over any peaks with a knife or credit card, leave it to set and then cut to the desired sizes. One of those large tubes should be enough to make several small squares, the same thing that is available to buy for around £4~£5 each in the shops.

    (The circular pattern on this one is from the underside of a rather hot 18w DDC )


    Next, tubing and tubing sizes...

    Reply With Quote Reply With Quote

  8. #8
    Clunk's Avatar
    Clunk is offline Monkey Trousers
    Join Date
    Sep 2007
    Location
    Manchester, UK
    Posts
    16,607
    Liked
    1411 times
    Country:         England

    Tubing And Tubing Sizes

    Tubing And Tubing Sizes.

    There are various brands of tubing, each with their own advantages and drawbacks - Over the years, I've found that Clearflex tubing clouds up quickly (Just a few hours in some cases), depending on the additives you use. As far as clear 1/2" ID tubing goes, I find the XSPC variety to be well priced and it stays clear for the duration (additives permitting!). Primochill Primoflex Pro LRT is also a good quality tubing that has a fairly tight bend radius, it is however, relatively expensive.

    Tubing Sizes.

    Personally, I prefer the 1/2” ID (Internal Diameter) tubing, simply because it doesn't kink as easily because it has a thicker wall. If you are planning a large loop with everything fitting into your case internally, then you may wish to look at a smaller bore tubing to save some space, this can make working on your PC later a whole lot easier. There are several other sizes of tubing available, and the more common ones include 3/8” ID and 7/16” ID.


    Many people use the 7/16” ID tubing on 1/2” barbs to give a slightly tighter fit and lose the need for hose clamps. I would like to stress that I don't recommend this method for beginners because if you need to remove the tube from the barb, you generally can't put it back (assuming you can get it off without cutting it in the first place!) - The tubing loses it's elasticity and you will either need to use a clamp or replace that length of tubing. Messy and not worth the bother at this stage.

    Coloured Tubing.

    Coloured tubing is a good idea if you still want to have a bit of UV colour inside your rig, but don't want the hassle of lots of flushing/dismantling to get rid of the excess dye.


    Hose Clamps.

    I always recommend that beginners use proper hose clamps (Jubilee clips). Some people will say that they don't look great, but once everything is in place, you can't really see them, and you will know that you won't have any leaks

    There are many different types of hose clamp, I've added a few to the image below. In my experience, the plastic ratchet type clamps are near to useless with the thick walled tubing, as are the spring loaded metal ones (bottom right). Standard hose clamps (top centre) will do the job as good as anything else out there, and if you really don't like the look of them, you can generally find some that are a little easier on the eye (far left), however, they often cost around 3-4 times as much, so it's worth shopping around for those.

    Several types of hose clamp.


    Next, water, additives, biocides and kill coils...

    Reply With Quote Reply With Quote

  9. #9
    Clunk's Avatar
    Clunk is offline Monkey Trousers
    Join Date
    Sep 2007
    Location
    Manchester, UK
    Posts
    16,607
    Liked
    1411 times
    Country:         England

    Water, Additives, Biocides And Kill Coils

    Water, Additives, Biocides And Kill Coils.

    The recommended thing to use in a water cooling loop is distilled water. Not everyone can get hold of distilled water, cheaply, so if that is the case, you can use De-Ionized water which is available from most car spares stores and supermarkets. To stop things going murky (think algae/nasty microbes), you can use a kill coil (see image below left). A kill coil is made from 99.999% pure silver, and that is what gives it its anti-algae/anti-microbial power.

    A kill coil could add a small amount of restriction to your loop as it pushes inside the tubing, however, this is a reasonably small price to pay for keeping things nice and clean.

    Another way to keep the nasties at bay, is PT-Nuke**. This is a potent biocide made from Benzalkonium chloride, although there is a Copper Sulphate version available, both will do the trick, and just a drop or two in your reservoir is enough to keep things clean.

    A Kill Coil and PT Nuke variants.


    De-Ionized water does “go off”, in so much as it starts to become ionised again as soon as you remove the lid, it's not a huge deal, but we want to keep the loop as clean as possible, so get a new bottle.

    For a number of years, I used De-ionized water and a 5% solution of Zerex super coolant, it works well but the Zerex can cause some brands of tubing to go cloudy quite quickly.

    Pre-Mixed Fluids.


    Another option to consider is pre mixed water/additives, but be warned, the dyes in many of these fluids can congeal around the insides of your water blocks and cause a blockage and also stain tubing, reservoirs and other acrylic items. Based on those points, I do not recommend using these kind of products unless you absolutely need to have coloured water in your reservoir.

    Pre-mixed fluids? Our survey says UH URRGH!


    Dyes.

    Again, these dyes can look great for a while, but we've see many people complaining about acrylic blocks and tubing becoming permanently stained, fins/pins inside blocks becoming clogged and even dyes losing their pigments over time. I still have a pair of perfect seal barbs that have their threads stained pink from some orange dye, no amount of scrubbing or soaking would remove it! If you aren't too bothered about any of the above, then they can be an unusual and arguably attractive addition to your loop - My advice here though, is to use coloured UV tubing instead.

    Avoid mixing metals.

    Copper and Aluminium don't play nicely in water. You may well end up with Galvanic Corrosion unless you use some kind of corrosion inhibitor. There are many on the market, such as G11, Zerex, Feser, but ideally though, try and keep all your blocks the same type of metal. Please ask on the forums for advice on specific gear.

    DO NOT use tap water – It can be full of all kinds of nasties that you DO NOT want in your loop.

    Next, barbs and compressions fittings...

    Reply With Quote Reply With Quote

  10. #10
    Clunk's Avatar
    Clunk is offline Monkey Trousers
    Join Date
    Sep 2007
    Location
    Manchester, UK
    Posts
    16,607
    Liked
    1411 times
    Country:         England

    Barbs and Compression Fittings

    Barbs and Compression Fittings.

    Barbs.

    There's no need to spend a fortune on standard barbs, just go for the ones that are pre-fitted O-ring (most are), the rest of the design is of little consequence to your overall set up and most will work well in your system.

    The barb tail (the bit the hose pushes onto) is measured across its widest part to give us the appropriate sizing, 1/2" for example, and for this size of barb, we would go for 1/2" ID tubing. In general though, when buying barbs from an on-line retailer, they are clearly marked and you shouldn't have any problems getting the correct ones.

    99% of all the current water cooling hardware uses the same G1/4 thread, the only exceptions that I know of are Thermochill radiators that use a 3/8 BSP thread, so unless you are buying Thermochill, then you can pretty much buy G1/4 parts with confidence. G1/4 relates to the thread type and is nothing to do with the size of the actual barbs.

    The other sizing aspect of barbs is the length of the barb. There are various different lengths now, ranging from stubby, right up to extra long. I can honestly say though, I have only ever needed to use a longer barb on one occasion and that was on a D-Tek Fuzion where the inlet and outlet were extremely close together, so much so, that it was very difficult to get the hose clamps onto the barbs. Adding the longer barbs meant that I was able to have one hose clamp higher than the other and this overcame the cramping issue!

    Below is a picture of a barb with a pre fitted O-ring. I've added a slightly different type of barb so you can see the difference - The one on the right has a recessed O-ring which may not be compatible with blocks/reservoirs/radiators that have a recessed thread. The left hand barb has a fully visible O-ring and a smaller hex head, so this will probably give you better compatibility over all, it also has a slightly fatter body so that you could, in theory, use it without hose clamps (not recommended here). The right hand barb will be more suited to blocks that have a flush thread.


    Compression Fittings.

    These are an alternative to standard barbs and they don't need any hose clamps. Other advantages are that they look nice and neat and are really easy to fit, but the downsides are that it is relatively easy to "wiggle" a tube free from the fitting on some models/with some types of tubing, resulting in a major leak. Another downside, especially for the 1/2" ID compression fittings is that they simply won't fit on a lot of blocks/reservoirs/radiators because they are quite large (see pic below), so you need to check this before you buy. Spacing isn't so much of a problem for 3/8" compression fittings and smaller.

    1/2" ID Compression fittings.


    Elbows, QDCs And other Miscellaneous Fittings.


    There are hundreds of different types of fittings on the market, some useful, some not so useful. We will just look at the more useful ones here.

    Elbows.


    These are always handy to have when planning your loop, they can make the difference between having a large unsightly bent piece of tubing, or a nice neatly tubed system. Elbows can be found in many different forms, ranging from plastic cubes with a couple of threaded holes for barbs, to full sized compression fittings with a rotary elbow built in. What's a rotary elbow? Well, if you can imagine taking a fixed 45 degree elbow and screwing it into something, you would often find that the elbow doesn't end up pointing the way that you want it to go, so a rotary elbow allows the elbow to be fully tightened down, but still allows the elbow to move around, thus giving excellent flexibility.

    Rotary elbows.


    Elbows can generally be found in 45° and 90° degree variants. There are some types of elbow that are best avoided as they contain a large chunk of metal which, when set at certain angles can cause a major restriction in the loop.

    Quick Disconnects (QDCs).

    QDCs are a pair of male and female ends for your tubing that allow a quick and mess free disconnect if you need to remove a component without draining the loop, they contain a spring loaded valve that shuts off the water flow when disconnected. Let's say for example, you had an SLI graphics set up and to remove the cards, the entire loop had to come out and be drained, with these QDCs strategically placed before and after the graphics cards, you could, just carefully unclip the QDCs and lift out the cards with them still filled with water. They are not foolproof, so caution should be exercised when unhooking the QDCs, always have plenty of kitchen paper handy and if possible, tip the case towards you so that if there is a leak, it runs out of the case instead of all over your motherboard!

    Purists may argue that these kinds of things cause too much restriction, but for the work they save and the convenience, they are definitely worth a look if you have a problem area in your loop. They are quite expensive at around £10/$13.50 each.

    Quick disconnect male and female fittings.


    SLI And Crossfire Fittings.


    If you plan on running dual water cooled graphics cards, you will need to somehow join them together. This can be done in a few ways, in years gone by, people would just cut a length of tubing to fit and this looked fine as long as the tubing length was exactly right. If the tubing was too short, it would pull the cards together slightly, and if it was too long, it would push them outwards. Nowadays you can get adjustable metal tubes specifically for this purpose, brands such as Phobya and Feser are popular choices.

    SLI fitting kit.


    Next, radiator fans and fan controllers...

    Reply With Quote Reply With Quote

+ Reply to Thread
Page 1 of 21 1 2 3 4 5 6 7 8 11 ... LastLast

LinkBacks (?)

  1. 21-02-2012, 14:39
  2. 05-02-2012, 05:03
  3. 11-12-2011, 04:09
  4. 17-11-2011, 07:36
  5. 26-10-2011, 20:36
  6. 09-08-2011, 17:47
  7. 12-05-2011, 00:28
  8. 13-04-2011, 21:50
  9. 07-04-2011, 22:23
  10. 31-03-2011, 13:40
  11. 11-03-2011, 15:30
  12. 06-03-2011, 14:15
  13. 03-03-2011, 05:53
  14. 02-03-2011, 18:47
  15. 26-02-2011, 13:55
  16. 21-02-2011, 23:39
  17. 10-02-2011, 22:15
  18. 17-01-2011, 13:50
  19. 14-01-2011, 07:56
  20. 04-01-2011, 20:49
  21. 04-01-2011, 12:38
  22. 27-12-2010, 16:24
  23. 26-12-2010, 17:37
  24. 25-12-2010, 23:18
  25. 25-12-2010, 10:18
  26. 24-12-2010, 22:39
  27. 24-12-2010, 17:30
  28. 24-12-2010, 08:41
  29. 24-12-2010, 02:36
  30. 24-12-2010, 02:29
  31. 05-09-2010, 09:01
  32. 03-09-2010, 17:52
  33. 18-08-2010, 00:07
  34. 17-08-2010, 19:44
  35. 17-08-2010, 12:56
  36. 13-08-2010, 10:55
  37. 06-08-2010, 17:20
  38. 06-08-2010, 07:16
  39. 02-08-2010, 18:43
  40. 02-08-2010, 08:38
  41. 02-08-2010, 07:20
  42. 02-08-2010, 06:09
  43. 31-07-2010, 02:34

Tags for this Thread

Posting Permissions

  • You may not post new threads
  • You may not post replies
  • You may not post attachments
  • You may not edit your posts